Add and Edit Roles
As a system administrator, you can add any number of roles to your installation. This section describes how you can do this.
First, you must be logged in as a system manager or system administrator.
There are four different areas you need to consider when defining roles:
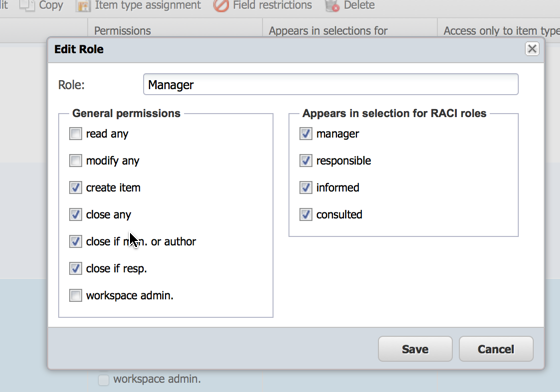
General permissions, as described below.
Assigning RACI selection lists, as described below.
Defining access to item types, see Restrict Access to Item Types for more information.
Hiding fields or making them read only, see Restricting Access to Item Attributes for more information.
Permission |
Description |
|---|---|
Read all |
You are allowed to read all items in this workspace, not just your own. If this indicator is not set, you can only read an item if you are the author, the current manager, the current processor, or you are entered as the editor or reader. |
Change all |
You can change all items in this workspace, not just your own. If this indicator is not set, you can only change an item, if you are the author, the current manager, the current processor, or you are entered as the editor. |
Create item |
You can create items in this workspace. |
Close all |
You can close any item that you are authorized to change. This flag does not imply any change authorization, it is merely superimposed on the possible change authorizations. |
Close as agent |
You can only close an item if you are the current agent. This flag does not imply any change authorization, it is only superimposed on the possible change authorizations. |
Close as manager/author |
You can only close an item if you are the current manager or the author of this item. This flag does not imply any change authorization, it is only superimposed on the possible change authorizations. |
Read/change own |
You can read/change items for which you have a RACI role, even if you do not have general read/change authorization. For example, if you are the reader of an item and have no other authorizations, you can only see this item. |
Workspace admin |
You can act as a workspace administrator or manager. You can assign users to your workspace and set all project parameters. You can archive and delete items, retrieve them from the archive or reactivate them. You can change the comments of other users and modify their effort postings. You cannot create a workspace, but you can create subspaces. Workspaces at the top level must be created by users with system administrator rights, for example, the system administrator (user “admin”). |
Selection List |
Description |
|---|---|
Manager |
This is not directly an authorization flag. It indicates that your name appears in the manager dropdown list when you modify or create items. |
Responsible |
This is not directly an authorization flag. It indicates that your name is being used when you modify or create items and it appears in the list of responsible persons. |
Editor |
This is not really an authorization flag. It indicates that your name appears in the editor dropdown list when you modify or create items. |
Reader |
This is not really a permission flag. It indicates that your name appears in the reader dropdown list when you modify or create items. |
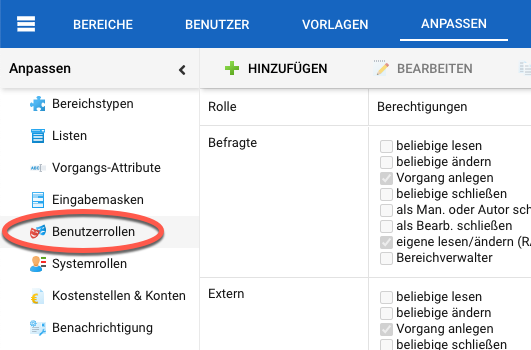
Switch to the administration panel. In the main menu, select Customize > User Roles.

Click “Add” on the toolbar or double-click a role to edit it. Fill in the form. For explanations of each checkbox, see the context description above.

Attention
If you rename an entry, it is possible that the change to the user interface will not be taken into account. This happens if you have specific localizations for the selection entries, which is the case for all predefined entries. In this case, the localized values are displayed and not the label that you define here.
When you are finished, click the “Save” button on the workspace toolbar.
You have created a new role with associated permissions. You or any workspace administrator can now assign users in this role to workspaces.